recipe

Argentine Tortilla (Tortilla de Papas)

individual tortilla de papas

Potatoes + onions + eggs + spices = divine combination. Right?

My family traveled to Brazil and Argentina this summer to visit family and celebrate my brother in law’s wedding. Visually and culturally, the trip was magnificent! It was a culinary eye opener for my kids, and somewhat difficult at times for one of my kids and for me to handle the amount of meat consumed. We don’t eat so much red meat at home, but in Brazil and Argentina, it’s ubiquitous.

One bright light: in Buenos Aires, my aunt wowed us with her Tortilla de Papas, an Argentine riff on the classic Spanish dish, Tortilla Española.
In the classic preparation, chunks of potato are fried in olive oil with onions and spices until they have beautifully browned edges, and then eggs are added. Once flipped, this omelet seals the deal as a simple, yet filling and comforting rustic dish. My aunt can make this with her eyes closed, and it’s absolutely delicious time and time again. But wow, it’s a messy affair! Oil splatters everywhere, and the need to pour out some of the excess oil is potentially a hazard. In general, not the kind of dish that I would personally want to make over and over.

Once home, I tried my hand at her recipe many times, and tinkered with it until I reached a dish that I would be happy making on repeat. Instead of frying in a cast iron pan, I’ve roasted and seasoned the potatoes and onions, then baked the whole thing with eggs. The roasted flavor carries over beautifully here, and you won’t need to wipe up all of the oil spatter from frying. This dish can be made in multiple sizes, with the only adjustment made in the cooking time.

tortilla de papas

It’s homey and comforting, and easy enough to make on a busy weeknight. I love this dish because it’s also hearty enough to have as a main dish. If you make this dish, post it and tag @lalalunchbox and #lalalunchbox on Instagram.

Tortilla de Papas

roasted onions and potatoes

1 pound of thin skinned potatoes (such as yukon gold), cut into 1 inch chunks
1 medium yellow onion, sliced into thin rounds
1 tablespoon paprika
3 tablespoons olive oil
6 large eggs
salt and pepper to taste

Method
1. Preheat the oven to 400 F.
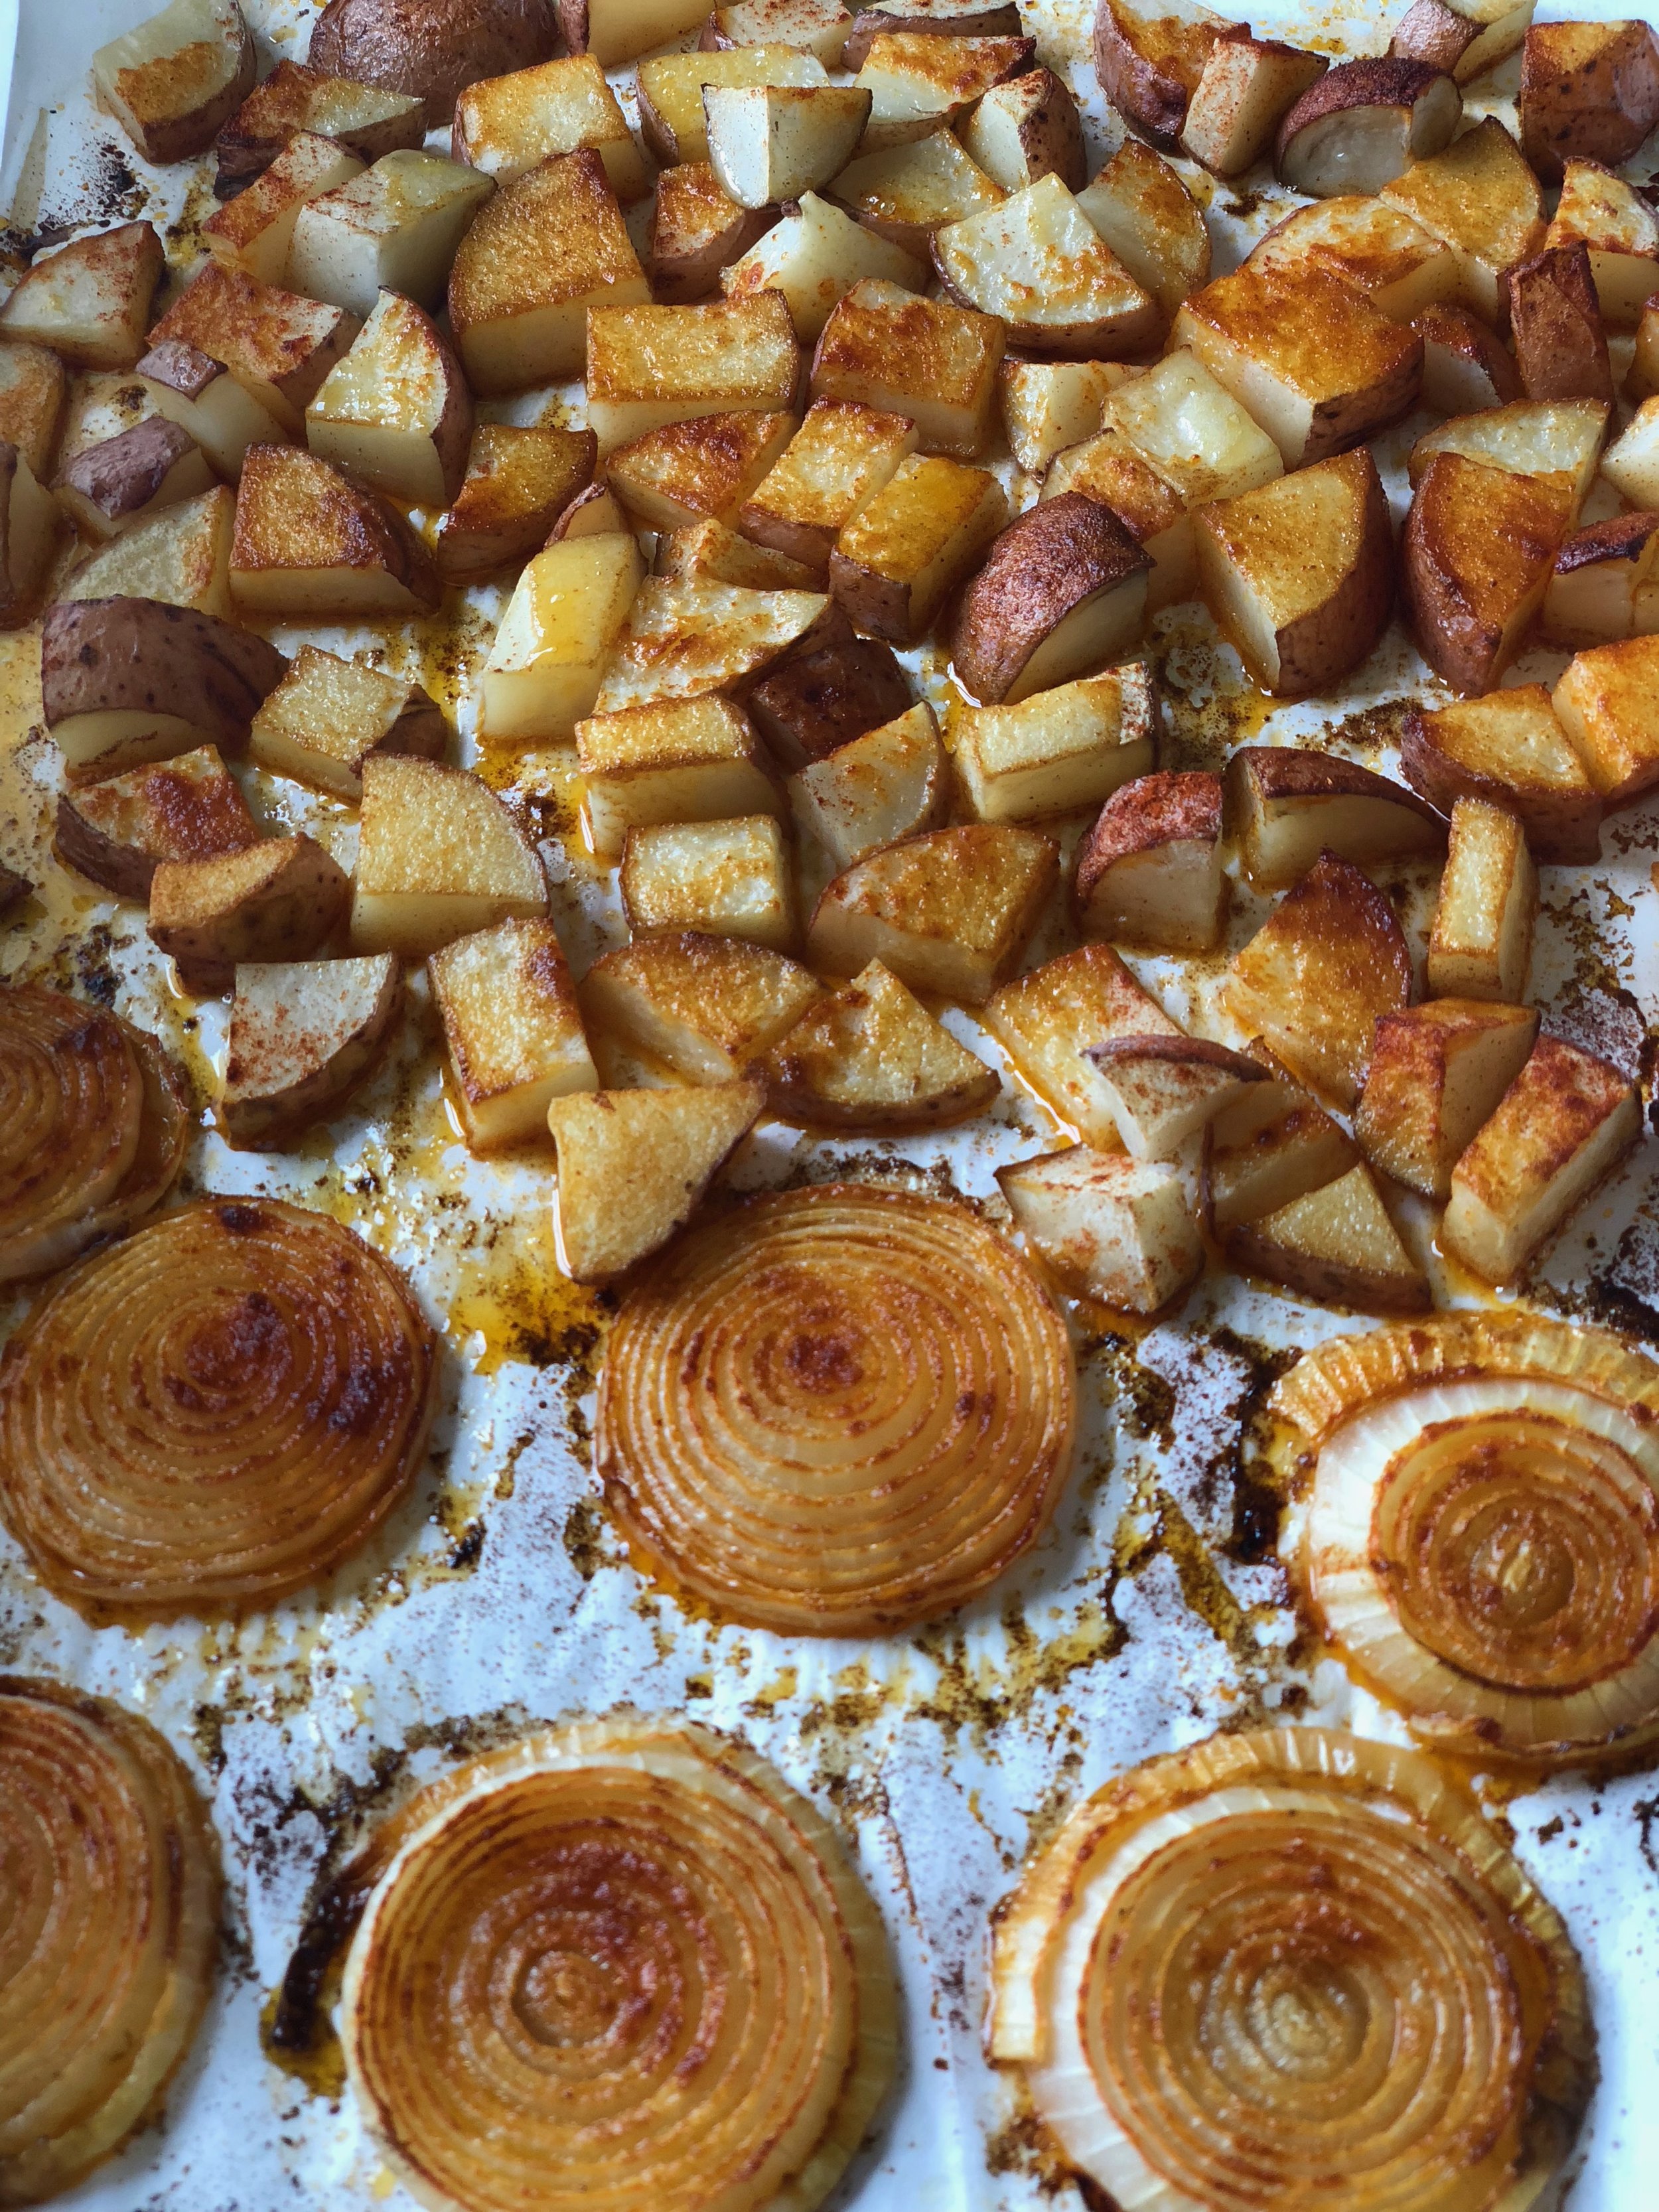
2. Lay out the potatoes and onions on a baking sheet lined with parchment paper, drizzle with olive oil and sprinkle with paprika.
3. Roast for approximately 35-40 minutes or until the potatoes and onions are nicely browned on the edges.
4. In a separate bowl, scramble the eggs and add salt/pepper to taste. I added just under one teaspoon.
5. Combine the roasted vegetables with the eggs and pour into an oven safe dish. You can line the top with roasted onion rings to make it look pretty.
6. Bake for approximately 30 minutes or until the eggs are just set.

tortilla de papas

Dulce de Leche Birthday Cake

Dulce de Leche cake with Spiced Whipped Cream

I like to bake. I like to cook. The two things are not the same for me, though. When I cook, I don't usually follow recipes to the T. To me, that's part of the fun. Cooking is an art that improves over time. Baking is different. Baking is a science, with measurements that need to be exact. I happen to like both, but I cook much more frequently than I bake. 

One thing I love to bake is birthday cake. Who doesn't love birthdays?! I don't usually love cake (why eat cake when you can eat cookies?) but I love celebrating. So when I was asked to make a Dulce de Leche cake by my friends' sweet son for his 12th birthday, I was happy to oblige. 

The problem was, I had never made a dulce de leche cake. And I don't actually love dulce de leche, as it's usually too sweet for me. Still, I perused recipes. I reached out to folks on Instagram. And I tested several recipes. Would dulce de leche go better with a white cake or a chocolate cake? I had to find out. Ultimately I decided to go with white cake, and I used a tried and true recipe that my mother shared with me ages ago. (recipe below)

dulce de leche

As for the dulce de leche, I made my own. Dulce de Leche is a creamy caramel sauce made from milk and sugar. You can speed up the process (which takes 7 hours!) by using sweetened, condensed milk and heating it for a long time until it caramelizes. Several recipes suggested that I boil the can - the whole can, unopened - for 2-3 hours. Boiling the can sounded weird to me. Is that even safe? I didn't know, but I saw the same instructions in so many places, so I gave it a try. The outcome was great. A uniform caramel color with a creamy sweet deliciousness. Still, the idea didn't sit well with me. I didn’t feel safe about it  

I wondered if I could get the same result by slow cooking condensed milk without using the can. I found several sources that suggested I could pour sweetened condensed milk into an 8x8 pan and put that dish inside of a 9x13 pan filled 3/4 of the way up with water. I placed it into an oven preheated to 400 degrees and cooked it for 90 minutes, stirring occasionally, until it became dulce de leche. When the cooking process was done, I whisked vigorously. The outcome wasn't uniformly colored, and there were some bits of condensed milk that became small clumps. At first I was disheartened by this. But ultimately I realized it's these small bits that make the texture interesting. They give life to the dulce de leche. So I went with it. 

Whipped cream frosting for the dulce de leche cake

I used the dulce de leche as the glue that held the two cake layers together, and also in the frosting. Instead of going with a buttercream frosting or anything that required confectioners sugar, I went with a whipped cream frosting. (recipe below) The results were fabulous! This cake went over so well, and frankly, I was relieved. I will absolutely make this again!

White Cake (makes two layers) 

  • 1 cup butter
  • 1-1/2 cups sugar (divided)
  • 1 teaspoon vanilla extract
  • 3 cups all-purpose flour
  • 1 tablespoon baking powder
  • 1/2 teaspoon salt
  • 1-1/4 cups milk
  • 5 large egg whites

Preheat the oven to 375 degrees. Grease the sides and bottom of two 9 inch cake pans. In a large bowl or an electric mixer beat the butter and 1-1/4 cups of the sugar until the mixture is smooth and creamy. If your butter is already at room temperature, you can do this by hand. Add the vanilla extract. In a separate bowl, combine flour, baking powder and salt. Add the flour mixture to the butter mixture in parts, alternating with the milk and gently mixing after each addition. In another bowl, beat the egg whites until they stand in soft peaks. Still beating, gradually add the remaining 1/4 cup sugar and beat until the mixture stands in stiff peaks. Gently fold the beaten egg whites into the batter. Pour the batter into the prepared cake tins. Bake about 32-34 minutes or until a cake tester inserted into the center comes out clean.
Let cool completely before taking out of the pan. Use a very sharp long knife to flatten the tops of each layer. Spread the dulce de leche generously on top of one layer and then place the second layer on top of that. Frost with spiced whipped cream and enjoy! Serve with extra dulce de leche on the side (optional) 

Spiced Whipped Cream
2 cups heavy whipping cream
2 teaspoons cinnamon
1/4 cup dulce de leche
pinch of salt

Using the whisk attachment of your standing mixer or a hand mixer, whisk the heavy cream on high until it begins to change form into whipped cream. Once you see that change, add the cinnamon, dulce de leche and salt and continue mixing until desired consistency. I prefer it well whipped, as I think it spreads best onto cakes. 

dulce de leche cake

Dairy Free S'mores Parfaits

campfire for s'mores

We kick off the start of summer every year with s'mores around a campfire on Memorial Day weekend. And though my kids absolutely love s'mores, we usually never have them after that. 

It's kind of a shame really. S'mores are basically the unofficial summer dessert, so why do we limit it to just once? I'll tell you why: campfires are a rare treat for us. No campfire, no s'mores. 

Until now. 

This year on Memorial Day weekend, I did something unexpected: I bought a container of fluff. My kids were flummoxed. I've never bought fluff in all my years as a parent. But somehow in the grocery store, I got the idea to combine fluff with brownies, and this recipe came into existence.  

Everyone cheered. But I still had a ton of fluff leftover. What to do? I set out to create a s'mores recipe that didn't require a campfire. It worked! My kids have been happily having s'mores parfaits all summer for the first time ever. Do they have that toasted marshmallow flavor? Nope. But no one seems to be complaining. 

sharing s'mores

The first step to making these s'mores parfaits is to make the chocolate pudding. I've used Ghirardelli 72% cocoa squares, which have a deep cocoa flavor and are dairy free. I added avocado to make it super creamy and plant-based milk to keep it dairy free. Because fluff is so sweet, and graham crackers are also usually sweet, I didn't want to overdo it and add sugar. I wanted the chocolate flavor to ground this dessert. The creaminess of the avocado tempers the bite of the cocoa, and lightens the flavor overall, making this a universally loved dessert around here. 

s'mores parfait ingredients

As an aside, I've been loving a yogurt called White Moustache recently, and they come in little 8 ounce glass jars. I keep the jars and use them for a million things, and these s'mores parfaits are just one example. An 8 ounce jar makes this dessert perfect for sharing, as it's quite large for just one person. Of course, you can modify the size of the container that you use. 

You can also use chocolate chips in place of the chocolate squares. Be sure to use chips that are high in cocoa content - I recommend 60% or more - to maintain the balance. I've also used the ghirardelli 60% cocoa squares with great success here, which yields a lighter cocoa flavor. 

All you'll need to make this parfait is a blender. If you don't have a microwave to melt the chocolate, use a double boiler and melt it old school on the stove top. 

The trickiest part of putting it all together is layering the graham cracker crumbs, chocolate pudding and fluff. The fluff is the hardest part, because quite frankly, it's sticky, so you'll be either rinsing your hands a lot, or licking them! And even if you don't master the layering on your first go, I guarantee that you'll have a good time licking your fingers! 

Dairy free s'mores parfaits

Dairy free s'mores parfaits

Ingredients
10 ghirardelli 72% cocoa squares, melted (or 3/4 cup chocolate chips, at least 60% cocoa)
1 ripe avocado, peeled and pitted
1/2 cup milk or plant milk
2 tablespoons unsweetened cocoa powder
2 teaspoons vanilla extract
Pinch of sea salt

1/2 cup (heaping) marshmallow fluff

8 full rectangles of graham crackers, crushed into crumbs

2 8 oz glass jars

Berries, for garnish

Makes 2 8 oz parfaits, (serves 4 total)

Method
1. Melt the chocolate. I used my microwave on high for about one minute and stirred until everything was melted and uniform. 

2. Combine melted chocolate, avocado, milk, cocoa powder, vanilla extract and salt in a blender. Purée on high for about 30-60 seconds until smooth and creamy. Scrape down the sides to make sure all ingredients are included. 

3. Crush graham crackers, either with a cuisinart or the old fashioned way (like I did) in a bag using a rolling pin. Make sure the bag is closed so that crumbs don't go flying everywhere! 

4. Separate the graham crackers into four approximately equal amounts. Use the first two piles to line the bottom of the two glass jars. Use the back of a spoon to pat down. 

5. Carefully spoon in some chocolate pudding on top of the graham cracker layer. Pat down. 

6. Next add about a heaping 1/8 cup of marshmallow fluff to each cup and use your fingers to pat down as much as possible. 

7. Repeat each of those layers until the cup is filled and refrigerate for at least an hour. 

8. Garnish with berries (and/or flake salt) and serve. 

These lasted beautifully in my refrigerator (covered) for two days, and I was happy to see that the fluff stayed ooey and gooey, just like in a s'more. 

You can pretend it's summer all year round with this recipe, so when it's the dark of winter and you need a little sprinkling of summer, whip these up! 

s'mores parfaits

Tomato Tarte Tatin with Caramelized Onions

summer sungold tomatoes

summer sungold tomatoes

Brunch was always something I looked forward to at the home of our longtime family friends, Rachel and Yehuda.  Their easy company and Rachel's delicious cooking guaranteed a lovely afternoon. They entertained gracefully and graciously and Rachel had a knack for finding great recipes. She had a knowledgeable palate, and could recreate dishes that she loved in restaurants or read in print seemingly effortlessly. After coming across a recipe for Tomato Tarte Tatin from Melissa Clarke in the New York Times, she decided to give it a try. It immediately became one of her favorite dishes.

When Rachel passed away recently from ovarian cancer, the world lost one of it's kindest people. Yehuda and their children planned a celebration of her life, as a way for her loved ones to gather together and collectively remember all of the joy that Rachel brought to them over the years. Yehuda reached out to some folks, including me, and asked us to bring some of Rachel's favorite dishes with recipes that he provided. I was asked to make the Tomato Tarte Tatin. Admittedly, I was nervous. I intended to make at least one as a trial run, but time slipped away from me. 

tomato tarte tatin

On the day of the celebration, I kept thinking of something my grandma used to say about never bringing something you've never made before to a dinner party. Gulp. And because this tarte is fully contained in puff pastry, I wasn't able to taste it ahead of time. But wow did it smell delicious! It seemed promising.

When I arrived, I was struck. There were photos everywhere of Rachel (and her loved ones). They told a powerful story of a humble, wise, happy woman who traveled, spent time with people she cared about, danced, cooked, worked and raised kids. It was an eye opening way to mourn and to celebrate the life of those who we've lost. 

One other person was asked to make the tarte, so if mine was a complete fail, at least there was a different version available. The evening was bittersweet, as you can imagine, and as it turned out, my tarte was delicious! And so was the other version! Simple, yet sophisticated flavor. I wanted to eat it forever. 

Today I remember and honor Rachel's memory regularly by making this tarte. I've adapted the recipe slightly and have gotten it to a place that feels absolutely right for us. This is the dish that I bring to potluck dinners. This is the dish that I bring to brunch. This is the dish that I make for guests. And I think Rachel would be absolutely delighted by that (as would my grandma, knowing that I'm representing with a known quantity of deliciousness). It's also gorgeous to look at, particularly if you buy mixed colored tomatoes. It's an inverted dish, so once it's done cooking, you flip it over onto a serving plate and the bottom becomes the top. I got a little fancy with it a few times and used leftover puff pastry dough to decorate the top. It can be a fun reveal if you present both sides, but that's not necessary. While this tarte is best to make in summer when cherry and grape tomatoes are at their peak, it is perfect any time of year. 

unbaked tomato tarte tatin

Ingredients

  • 1 14-ounce package all-butter puff pastry
  • 2 tablespoons unsalted butter
  • 3 red onions, halved and thinly sliced
  • 2 tablespoons + 1 pinch sugar
  • 1 tablespoon sherry vinegar
  • 1/3 cup chopped pitted Kalamata olives
  • 2 pints cherry or grape tomatoes
  • 1 tablespoon chopped fresh thyme leaves plus extra for garnish
  • Kosher salt, to taste
  • Freshly ground black pepper, to taste
puff pastry top tomato tarte tatin

Method

Preheat oven to 425 degrees. Thaw the puff pastry until it's still chilly, but not frozen. Unfold it and cut into a 10-inch round. Save the scraps if you want to decorate the top/bottom. Place in the refrigerator until ready to use. 

Melt butter in a large skillet over medium heat. Add onions and a pinch of sugar and cook, stirring, until onions are golden and caramelized, 20 - 25 minutes. Add 2 tablespoons water and let cook off, scraping brown bits from bottom of pan. Transfer onions to a bowl and set aside.

In a sauce pan, combine 2 tablespoons sugar and 3 tablespoons water. Cook over medium heat and swirl pan gently without stirring until sugar melts and turns amber, about 10 minutes. Add vinegar and swirl gently. Turn off heat. 

Pour the sugar, water and vinegar caramel into a 9 inch cake pan. Sprinkle olives over caramel. Add the tomatoes over olives, then spread the onions on top. Season with thyme leaves, salt and pepper. Top with puff pastry round, tucking edges into pan. Cut several long vents in top of pastry to let the steam out during the cooking process.

Bake tarte until the crust is puffed and golden, about 35 minutes. Let stand for 5-10 minutes, then run a knife around pastry to loosen it from pan, and flip tart out onto a serving platter. Garnish with thyme leaves and serve warm.

tomato tarte tatin

Birthday Brownies

IMG_0289.jpg

The year that I sent my daughter to school with strawberry shortcakes on her birthday will probably go down as the worst.

She's always been a strawberry girl, drawn to both the fresh-picked, tiny sweet ones and the large, often less flavorful ones we find at the market. Ages ago, she came across a fun fact that strawberries were the only fruit that had seeds on the outside, and it became one of her favorite stories to tell for a while. She's also huge fan of all things bready, and biscuits fit beautifully in that category. And fresh whipped cream? It's got her name all over it. My mother made strawberry shortcakes for her one day and she was smitten. 

IMG_4134.jpg

So that year for her 5th birthday, I made strawberry shortcakes - at her request - for her in-school celebration. The kids hated them! Okay, hate is definitely too strong, but I learned that kids have expectations for classroom birthdays and strawberry shortcakes didn't make the cut. That's a whole other topic, and I'd love to discuss it but I'm all about the birthday dessert today. Anyway, we had a lot left over that year, which no one here complained about. 

Brownies are universally beloved. 

Brownies are universally beloved. 

From then on, my kids have requested more traditional things for school, like cupcakes or cookies. Works for me. At some point, they'll stop asking for homemade desserts for school birthdays, so I'm happy to comply annually until then. This year, my newly minted 12 year old asked if I could please make brownies for school. Brownies were definitely not going to be panned. Who doesn't love brownies? I *love* them. An extra batch of brownies doesn't stay around for long, and making them is easy and fun. 

The recipe that I've been loving lately is adapted from Smitten Kitchen. The brownies are dark, rich, chocolatey and not too sweet, and definitely not cakey. I made four batches in two days, sending off three to school and saving one for us. I've replaced the AP flour with oat flour, making these gluten free, and I've reduced both the sugar and the cocoa powder. I also found that they needed a bit more time to cook, so I've reflected that in this recipe (scroll down). 

Here's how easy they are to make (as opposed to strawberry shortcakes, which took me way longer, and were much more labor intensive). It's just 7 ingredients and 6 steps --- take a look:  

Brownie ingredients: 7

Brownie ingredients: 7

1. First mix the butter and sugar.

butter + sugar

butter + sugar

2. Add cocoa powder and stir to combine. 

added cocoa powder

3. Add salt. 

Add salt

4. Add eggs and vanilla. 

add eggs

5. Add oat flour and give it one final stir. 

Add oat flour

6. Ready to bake! Place in a parchment lined pan in a preheated 325 degree oven for 25-28 minutes.

ready to bake


Birthday Brownies

  • 10 tablespoons unsalted butter (room temperature)
  • 1 cup granulated sugar
  • 3/4 cup unsweetened cocoa powder (natural or Dutch-process)
  • heaping 1/4 teaspoon flaked salt
  • 1 teaspoon pure vanilla extract
  • 2 large eggs, cold
  • 1/2 cup oat flour

Preheat the oven to 325°F. Line the bottom and sides of an 8×8-inch square baking pan with parchment paper or grease with avocado oil or butter.

Combine the butter and sugar in a large bowl. Add cocoa powder and salt and stir until all lumps are gone. Stir in vanilla, eggs and oat flour and mix with a wooden spoon until the batter is smooth and thick. Spread evenly into the pan. 

Bake for approximately 25-28 minutes or until the brownies have set and a cake tester comes out clean. Let cool completely on a rack. Cut into 16 or 25 squares and watch them disappear. 

ultimate brownies