DIY

DIY Pita Bar

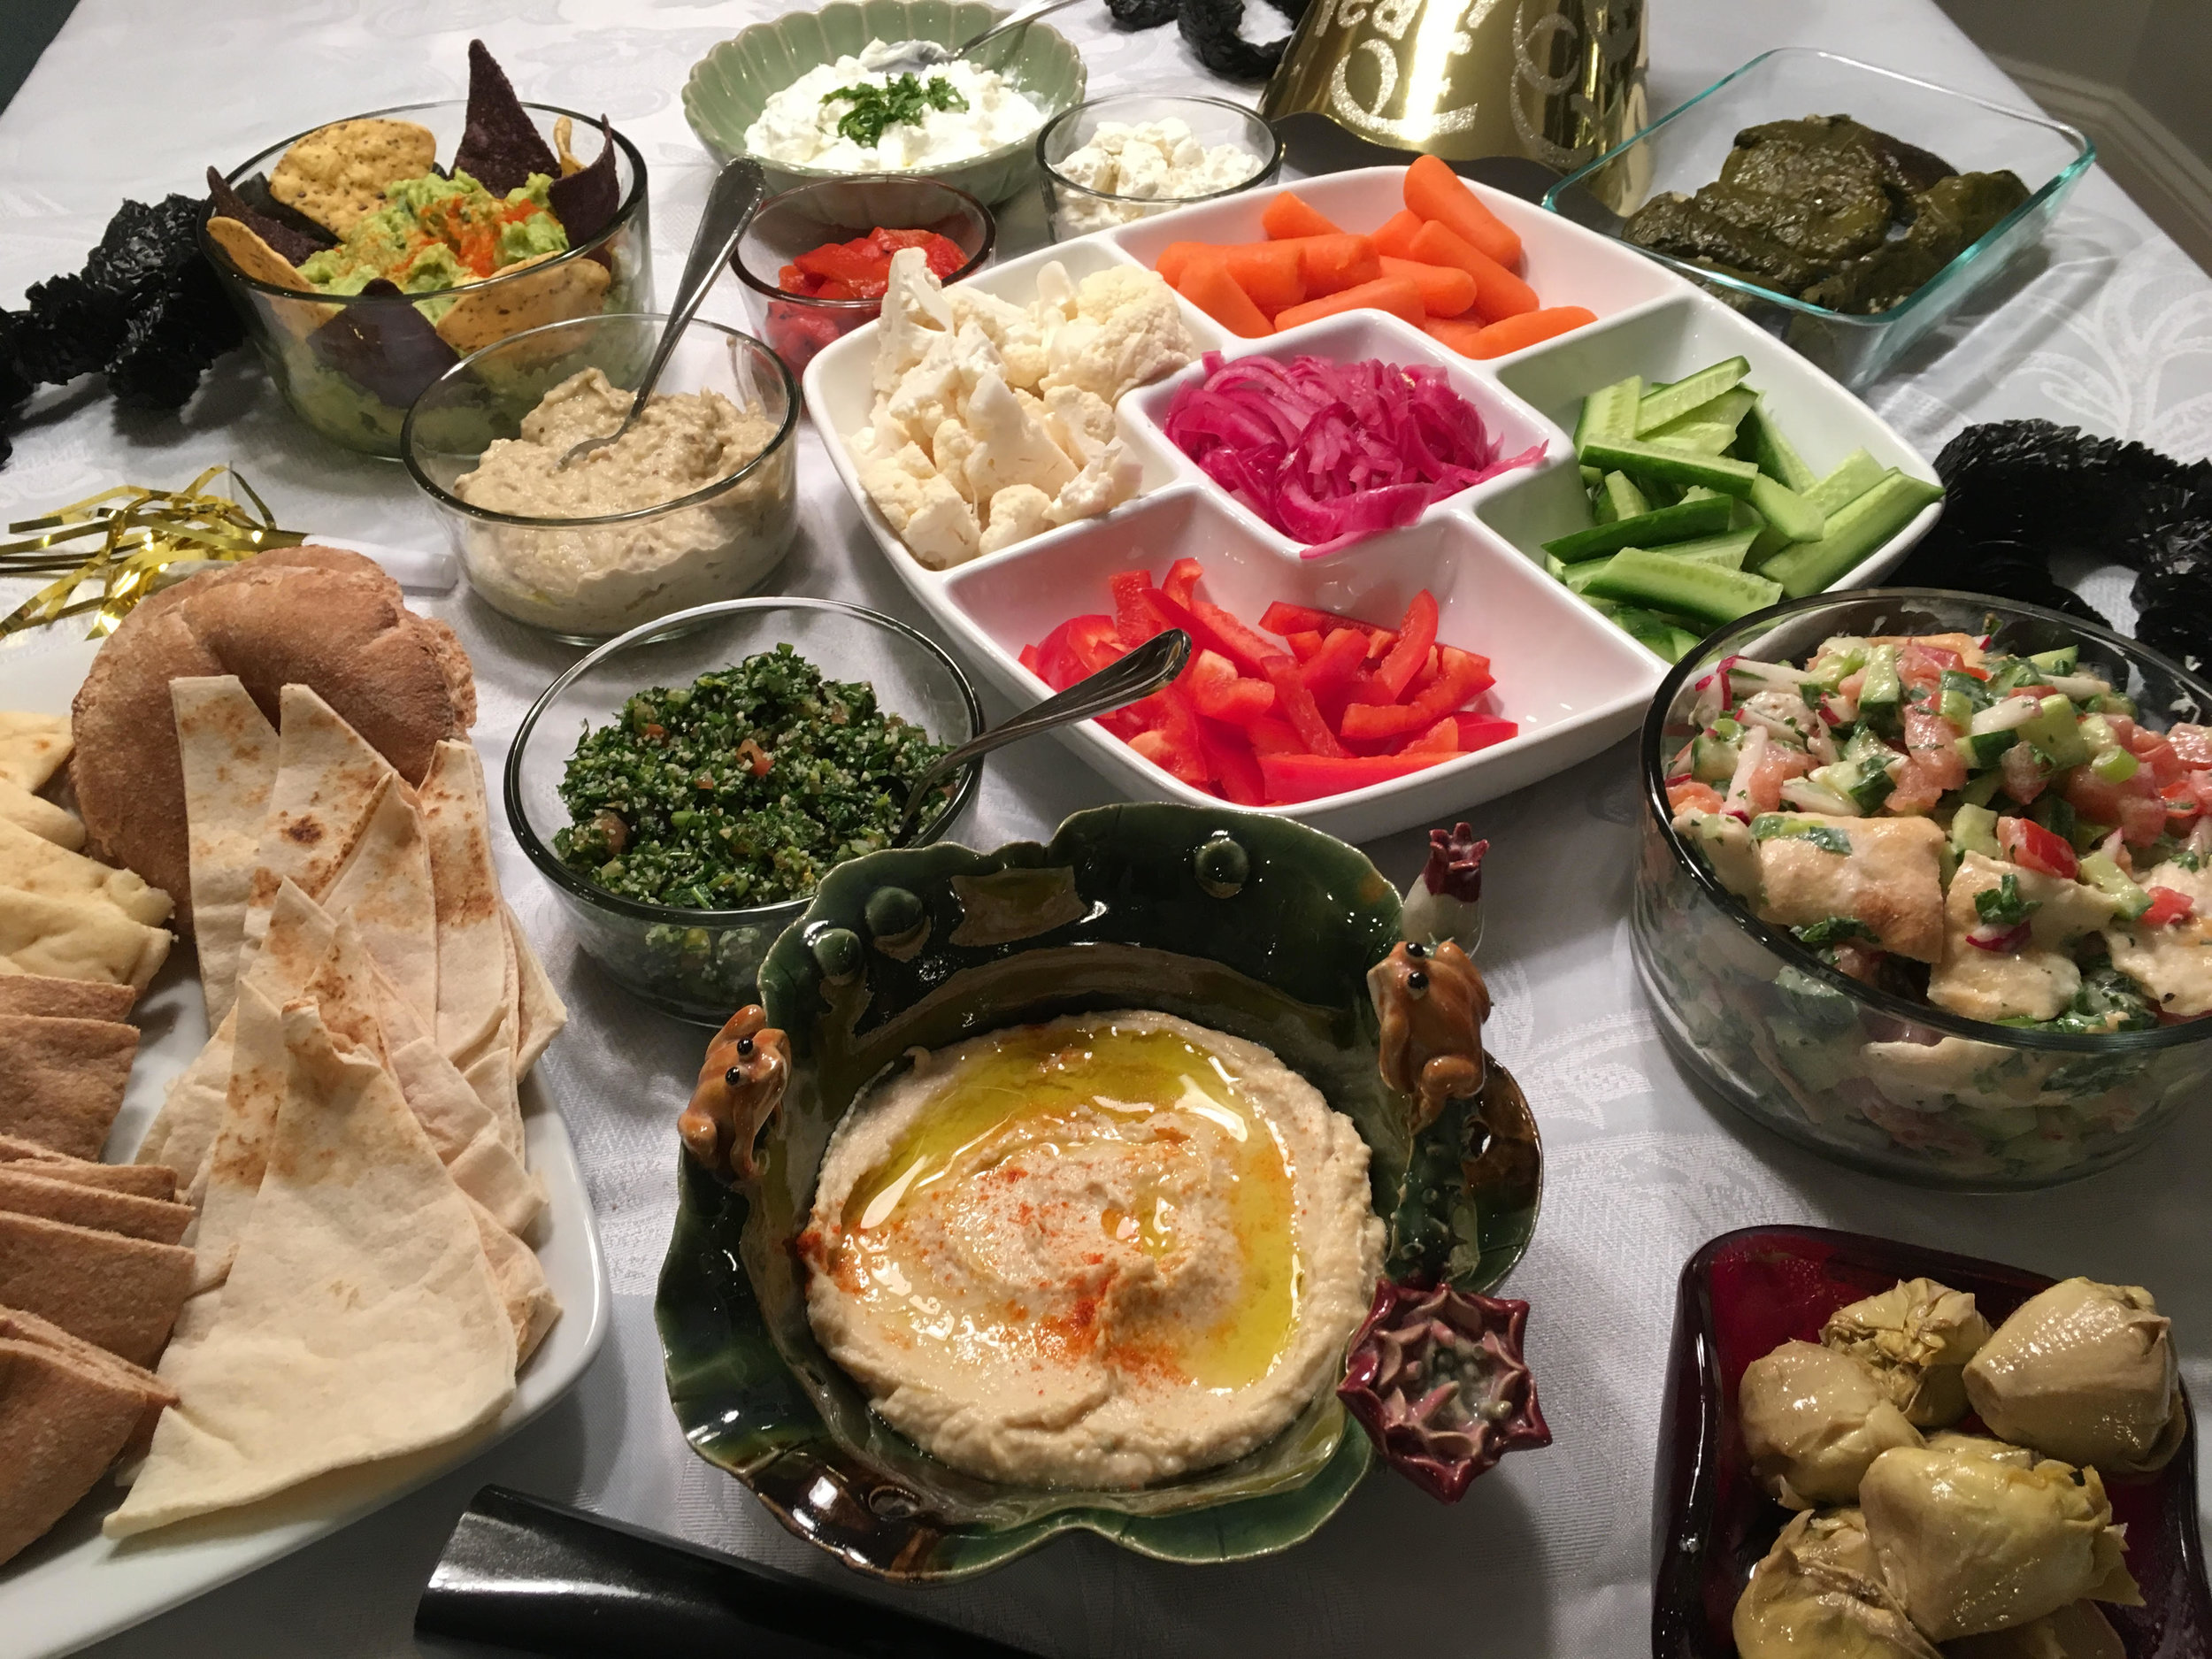
The holidays may be over, but with football season in full swing, you may still be entertaining guests. If you're out of ideas or sick of the chips, nachos, guacamole theme, this Pita Bar might be right up your alley! Here's what we served at the Pita Bar for our New Years Eve party for six kids and six adults, and there was something for everyone:
* Pita
* Hummus
* Baba Ganoush
* Labne
* Tabbouleh
* Fattoush Salad
* Roasted artichoke hearts
* Roasted red peppers
* Feta cheese
* Guacamole
* Pickled red onions
* Fresh veggies
* Grilled chicken (boneless thighs and boneless breasts) 
* Lamb meatballs

Pita Bar

We bought most of the ingredients already prepared, with the exception of the Fattoush salad, the guacamole, the pickled red onions, the grilled chicken and the meatballs. It made hosting a party of 12 much more feasible! The meatballs were a huge hit, and here's the recipe: 

Lamb Meatballs

Ingredients:
1 pound of ground lamb
2 tablespoons fresh mint, chopped
2 tablespoons fresh parsley, chopped
2 small cloves of garlic, minced
1/2 teaspoon salt
1/2 cup unseasoned panko
1 large egg

Preheat the oven to 375. Mix all ingredients together in a bowl, making sure that the consistency is uniform. Roll into 2 inch balls and place on a cookie sheet lined with parchment paper. Roast for approximately 20 minutes. Enjoy! 

Pizza Pockets

Pizza Pockets

Pizza. I said it and you got hungry, right? My two older kids love it, but if we eat pizza, it's always made at home. My youngest is dairy free and ordering a cheeseless slice is too hard sometimes. Pizza Pockets are a new fun way for us to eat pizza as a family and they're a great opportunity for us to customize our toppings, or fillings, as it were. The end result is a dish full of pull-apart pizza magic! It's hands-on fun for the family, and if you're a fan of the DIY meals like we are, you'll want to add this to your list. These are great for packing in those lunchboxes too, and so easy to add to the LaLa Lunchbox food library! 

Here's what you'll need: 
Pizza dough (I used multigrain that I bought at the supermarket)
Tomato sauce
Cheese
Fillings (we used sausage, kale and red peppers)

Here's what to do:
1. Preheat the oven to 425 F. Line a baking dish with parchment paper and brush with olive oil. Roll our your pizza dough on a floured surface until it's about 1/2 inch thick. Using a circle shaped cookie cutter, cut the dough into circles and set aside. 

dough circles

2. Add a spoon of sauce to the center of each dough circle. 

dough + sauce

3. Add your fillings. I sautéed sweet Italian sausage with kale, red onion and red bell peppers in advance but anything goes here! 

Pizza Pocket with topping

4. Add cheese. Looks like a mini pizza! 

Pizza Pocket with cheese

5. Fold up the sides into a ball, give it a little twist and place it with the seam down into your baking dish. I've marked the dairy free ones with an oregano leaf on top. Brush the tops with olive oil. 

Pizza Pockets ready to be baked

6. Bake at 425 for approximately 30-35 minutes. Here's what it looks like when done: 

Pizza Pockets fresh out of the oven

And the inside? Yummazing. These are easy to pull apart, delicious to eat and also great for lunchbox leftovers the next day! 

Pizza pocket deliciousness

DIY Meals for Kids

I'm a big fan of kids in the kitchen. But I'll be honest, despite all of the reasons to get kids cooking, sometimes the reality of the giant mess that usually follows is completely unappealing. On the days that I just. cant. deal. with that kitchen mess, but still want to keep the spirit of kid involvement alive and well, I go DIY. 

Below are five ideas for you to have some fun with mealtime. They've been a huge hit in my house and as an added bonus: the prep is done by me so my kitchen isn't a complete disaster by the time the meal is served. I hope they're a hit in your house too!  

1. DIY Tacos
Who doesn't love tacos? Actually, one of my kids doesn't love tacos, so when we have DIY Tacos, he makes himself a quesadilla and eats beans and pineapple on the side. Fine by me. But for those who DO love tacos, you can make it fun with black beans, ground meat (season with chile powder and garlic), cheese, cilantro, limes, pineapple, avocado, guacamole, salsa, sour cream, lettuce, peppers and cucumber. Don't forget the tortillas! 

DIY Tacos

2. DIY Bruschetta 
The inspiration for this one comes from What's Gaby Cooking. I saw it and was instantly smitten. My family went bananas for this because there are so many flavor opportunities! DIY Bruschetta is fabulous for entertaining as well. Here we've got grilled bread with: goat cheese, ricotta cheese, fresh mozzarella and a slicing cheese, grilled corn, roasted tomatoes, roasted pepper puree, bean dip, hummus, grilled mushrooms, olives, caramelized onions, guacamole, grilled steak, prosciutto and pesto. Note: when we do this for dinner for just my family, we don't have this many options! This photo was taken before entertaining some guests. :) 

DIY bruschetta

3. DIY Oatmeal  
Cook a big old batch of oatmeal and put some favorite toppers in a muffin tin for the kids to choose from. Ours include: strawberries, raspberries, coconut, banana chips, pumpkin seeds, chopped apple, chopped banana and golden berries. 

DIY oatmeal

4. DIY Pasta
Pasta can be a challenge in my house because my youngest can't eat dairy, my oldest loves dairy and doesn't like too many ingredients in her pasta and my middle child doesn't love meat and eats cheese sparingly. DIY Pasta is a blessing for us! We usually have it with meat or chicken (often leftovers cut up), peas, ricotta cheese, parmesan cheese, basil, tomatoes and peppers. I frequently have tomato sauce as well.  

DIY Pasta

5. DIY Egg Roll Ups
I got the idea for Egg Roll Ups from Aviva Wittenberg. Essentially, it's using egg as a tortilla replacement and it's pretty genius! Scramble the egg and fry it in a pan with a little butter, flip it after a few minutes and then slide out of the pan onto a plate. Once cool, you can use it like a tortilla and roll up anything you want! For us, it usually involves cheese, quinoa or rice, veggies (below, we have purple cabbage, zucchini, green beans and tomatoes) and ham or chicken (often just cut up leftovers). 

DIY Egg Roll Ups

Are there DIY meals that you make at home? We'd love to hear about them! 

DIY Pizzas and "no touching raw meat"

It's well documented that my kids voice their opinions when it comes to breakfast and lunch and that it's something that I both encourage and celebrate. But dinner? That's all me. Whatever I want to make (and eat) for dinner is what we're doing. I'm usually pretty confident that each of my kids will enjoy some part of dinner – but frankly with three kids (one of whom can't eat dairy, another who would eat her weight in dairy and pasta every day if she could and a third who basically only eats fruit, yogurt and chicken legs but will sometimes experiment with whatever his big sister is eating), it's near impossible to please everyone all of the time. Fine. Even when I'm past that challenge, dinner needs to be ready quickly. I aim for 30 minutes or less. And it usually has a protein, a vegetable and a fruit. 

DSC03195.JPG
DSC03147.jpg

After this weekend's kitchen disaster, where embarrassingly I mangled two fingers in a stick blender, I was told by an ER doc not to touch raw meat until the stitches come out next week. You can't be too careful when it comes to potential infection and wounds. I'd be fine with grain and green salads and black beans for days (or weeks!) on end, but I'm not sure the rest of my gang would feel the same. 

So tonight we're making pizzas. I bought whole wheat pizza dough and found these organic (fully cooked) sausages at my local market that my crew can add to their pizzas or have on the side (or not). My kids go bananas for DIY pizza. I cut some corners by buying pre-shredded cheese (I'm feeling a bit squeamish about sharp edged things at the moment) and buying already prepared sauce. We'll pair it with grapes (cut for the baby) and frozen peas (my son prefers these still frozen) and call it a day. It's a win-win, as far as I'm concerned. The prep time is not much more than the time it takes for my kids to roll out the dough and spread their own toppings, and I've followed doctor's orders. 

DIY pizza means you can leave the cheese off part of it, for the dairy-free! 

DIY pizza means you can leave the cheese off part of it, for the dairy-free! 

DSC03201.JPG

Lunchbox-Friendly Sushi

LaLaLunchboxSushi.PNG

Let me put this right out there: DIY sushi rolls with the kiddos is a lunch that packs itself.

I've always been fascinated by sushi: the art of it, the buzz around it, the quest for the freshest fish, the accoutrements. I'm not able to indulge in any of it thanks to my fish allergy and I rarely take chances in a sushi restaurant with the non-fish items because even the slightest bit of cross contamination leads me to Benadryl. 

A couple of years ago, when we discovered that my eldest daughter didn't have the allergies that I have (phew!), she and my husband began a sweet tradition of going out for sushi as a twosome. At some point, a second tradition emerged and we began making vegetarian rolls of our own at home. My daughter (then in kindergarten) was completely enthralled by the DIY rolls and all things with seaweed. Her love affair waned for a long while but now it seems to be back. She and I went to the market together the other day and she specifically requested sushi rice and nori. I wasn't at all surprised to see it on her LaLa Lunchbox meal plan this week and was kind of excited for this lunch-making activity.

Making sushi rolls is one of those things that sounds involved. And messy. And hard. But I swear, it isn't. I was really feeling victorious about the whole thing until I realized that my littlest one was systematically removing all of the folded clothes from her dresser drawer as we were DIYing with nori. That was big fun. But I digress.

These sushi rolls really are an easy project to do with kids and you can basically put anything you want in them. We chose to fill them with egg and avocado. I explained it to my 3.5 year old sushi newbie like this: "First, we're making rice. Second, we're frying two eggs. Third, we're slicing an avocado. Then it's all about the rolling." 

Bam! It really is that straightforward. My kids overstuffed the rolls in their excitement, of course, and my son was a little taken aback by just how sticky the rice was on his fingers. But they were both proud as peacocks about these rolls, and completely excited to pack them in their lunchboxes. Two rolls, sliced into pieces, fit perfectly into an Easy Lunchboxes container – woot! 

DSC02866.JPG
DSC02886.jpg

Never made sushi rice before? Never fear. Here's how: 

Bring 1 cup of sushi rice and 1.5 cups of water to a boil. Cover and simmer for about 20 minutes or until the water has evaporated completely. Add 2 tablespoons of rice vinegar (unsweetened) and stir. 

To assemble the rolls, here's what you'll need:

  • 1 package of nori (toasted seaweed)
  • 2 TB rice vinegar
  • 1 cup sushi rice, prepared
  • 1 avocado, sliced
  • 2 eggs, scrambled

Prepare the sushi rice and set aside. Lay a piece of nori on a mat and sprinkle lightly with water. My son likened it to rain drops. Spread the rice evenly on the nori, making sure to leave room on the edges (about 1/2 inch, plus more at the top for sealing). Place the avocado slices and egg pieces along the bottom edge of the rice and roll up the nori like a burrito. Seal the edges with wet fingertips. Slice with a sharp knife and enjoy! Makes about 6 rolls. 

See that cute little pink bunny thing below? It's a teeny container for soy sauce! 

DSC02929.jpg